

3 days ago
Thursday 30 December 2010
Fab giveaway
Lin from LB Crafts has a fab Tim Holtz giveaway on her blog http://yoursartfully.blogspot.com/2010/12/tim-holtz-giveaway.html
Friday 24 December 2010
Quilting for Christmas
I promised my husband I would make some quilts for his family so have been busy the last few weeks finishing them. They are both variations of the same design but the colour schemes are very different. The first is a lovely delicate mix, not my usual style but one I'm definitely going to try again as it worked so well. The second quilt is a more neutral palette to suit the tastes of the recipients.


The other recipient is going to receive the clown quilt I blogged about a while ago.


I also made some Christmas placemats for friends.

Now, off to cover a book with some fabric for the last gift I need to make.
Merry Christmas :)


The other recipient is going to receive the clown quilt I blogged about a while ago.


I also made some Christmas placemats for friends.

Now, off to cover a book with some fabric for the last gift I need to make.
Merry Christmas :)
Christmas decoration swaps
We've beem having a few swaps on the forums I visit so I thought I'd just show a sample.
Decorations I made for a swap on UKStampers, including the one I sent to a Cloth Nappy Addicts swap:


The CNA swap was interesting as we had to make a quality decoration ourselves, and then let our children make some decorations. These are the lovely goodies I received:


Decorations I made for a swap on UKStampers, including the one I sent to a Cloth Nappy Addicts swap:


The CNA swap was interesting as we had to make a quality decoration ourselves, and then let our children make some decorations. These are the lovely goodies I received:


Thursday 18 November 2010
The Altered Element - Art metal reindeer decorations

Art metal is fabulous for making Christmas decorations for your tree, exquisate charms can be made quickly and with great effect.
Here I have taken some silver-coloured aluminium from The Altered Element, backed it with foam for stability (card would work too) and then die cut 2 reindeer in my Big Shot. Then they are run through again in a cuttlebug embossing folder. Using a hand punch, I fixed fancy embroidery thread to dangle them from a tree. Simple but effective.
If you wanted a more grungey look you could apply acrylic paint and wipe off again to age it but I prefer mine shiny :)
The Altered Element has a wide range of art metals suitable for this project.

Friday 12 November 2010
The Altered Element - Artchix Angels

Sometimes the prettiest of things can be quite simple to make. These Christmas Tree Angels are made from Artchix images, backed with patterned card for stability. The skirts are made from chiffon, a running stitch is used to gather the top which is then sandwiched between the image and another piece of card. The edges of the skirts were themn dipped in Decofix, and glass glitter applied to one, mother of pearl flakes to the other. Ties were created from metallic emboidery floss. This idea would also make a great angel for the top of the tree, or even table accessories.
All the commponents for these angels are available from The Altered Element, which also has lots more goodies suitable for your arty Christmas decorations.
Monday 4 October 2010
OBV facial pads restocked

I have just restocked the obv facial pads available in my Folksy store. These are my best selling item and always sell out.
These gorgeously cuddly and colourful facial pads are ideal for use with cleansing creams. The outers are soft organic bamboo velour (70% bamboo, 28% organic cotton and 2% polyester) and inside is a layer of organic hemp/cotton (55% hemp, 45% organic cotton). These are hand dyed with procion mx and colours will vary. You will receive a set of 4 tied with a co-ordinating ribbon. £5 plus 50p postage.
Friday 1 October 2010
The Altered Element - Motherhood Diptych

I recently received this superb wooden diptych from The Altered Element and knew straight away that I wanted it to be decorated in a tribute to motherhood. The base was gesso'd then painted with several light layers of cream acrylic and reed Decoupaint Antik. The edges were given a light brush of old gold Decoupaint Patina. I gently dyed some vintage pages on an old 'Book of Common Prayer' in tea, these pages were from the Service for Churching (a medieval service used when mothers returned to church after giving birth) and Child Baptism. These were then carefully sewn to ripped white butter muslin (cheescloth) in a red feathered straight stitch. They were adhered to the base using collage medium, creating a slight tranparency to the fragile pages. Lastly I addded images by Artchix and some vintage buttons.
Monday 27 September 2010
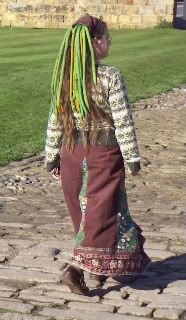
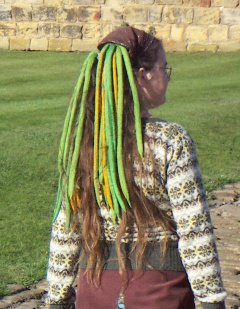
A rusty bustle skirt - Alter It Monthly entry
When I saw that September's theme at http://alteritmonthly.blogspot.com was rust I just couldn't resist having a go. You see, I've been boring my family silly for months with rust dyeing. It started when dh found a bowl of rusty nails while building our new chicken shed. Since then I have used it to dye calico, muslin, bamboo velour (going to make a lovely hoody from that) and there's some silk in there at the mo. So I thought I'd create a rusty bustle skirt for this month's entry - maybe I should call it a rustle skirt.


I used a rust dyed Sanderson curtain with rust dyed calico for the main skirt. The pocket is a rust dyed cluny lace table mat which has been sewn on in a feathered straight stitch.

I used some rust dyed vintage cluny lace for the waist decoration, machine stitched the word 'rust' then accented it with some rusty discs from the dyeing bowl.

The waist ties are made with rust coloured bias binding and have a clock face and key dangling from the ends.

I think it has quite a steampunk feel.

UKStampers mail art swap
I recently received this beautifully stamped card as part of a mail art swap on UKStampers :)

Thank you LME, it is lovely and the colours are very me.

Thank you LME, it is lovely and the colours are very me.
Tuesday 21 September 2010
Simple strip quilt

This quilt is a basic strip quilt using a Bar Harbor scrap bag for the strips and a pair of vintage Sanderson floral curtains with oriental bird design for sashing and backing. The batting is organic cotton and it is quilted 'in the ditch' around the strips. This quilt is destined for our bedroom once it is re-decorated.

Wednesday 15 September 2010
Altered Element DT - Dainty apron

In the August DT pack I had a lino cutting kit which I used to design a greek horse stamp. I decided to experiment further with the stamp using Jacquard Lumiere, my favourite fabric paint with it's great texture and slight shimmer. The greek horse seemed to lend itself well to a vintage nursery theme so I set out to evoke a bygone era with a dainty apron.
This apron, made to my own design in heavy unbleached loomstate calico, has been stamped with Jacquard Lumiere which has then been heat set with an iron. Accents are provide by stitched framing, muslin layering and a variety of machine stitching in red. It is finished with red tulle ties. Being wearable art, it is designed to be worn and can be washed gently at a low temperature. Pretty but practical.


Thursday 9 September 2010
Bark - nuno felted scarf

My play with procion mx dyes and scrim/cheesecloth produced some colourful pieces of fabric ideal for nuno felting (felting wool onto fabric). To do this the fabric needs to be fine and loosely woven, making scrim ideal. Methods of felting do vary and I don't stick religiously to any one method.

I took a piece of dyed scrim and cut it to the required length - the felting process will shrink it by 20-30%. I decided not to finish the edges as I wanted a more organic, unstructured look. On my table were towels and bubble wrap, which I laid the fabric onto. I layered wool roving in random directions, overlapping yet leaving some areas free from wool, adding a touch of wensleydale fibres to the edges. I layered quite thickly as I wanted a bark-like effect but a finer scarf would need much less wool. I then covered the area with net and sprayed with cool soapy water. I did not use warm water yet as I wanted the fibres to start to adhere to the fabric before felting.

I then rubbed soap over the net and rubbed the fabric until the fibres had travelled through the fabric, initially patting down, then using circular movements. Occasionally I had to lift the net as the fibres were attaching to that.
Once the fibres were adhered and no longer moved around I removed the net, placed bubble wrap on top and rolled the scarf around a piece of swimming noodle, securing it with elastic bands. I rolled it 100 hundred times from each end, then rinsed in hot water and repeated this several times. It is important to change sides and direction for even felting.
I then removed the scarf from the noodle, stretching it into shape. I submerged it in hot water and it was the folded into a parcel and thrown onto the floor 25 times, opened and refolded and repeated - this was done several times. Finally it was rinsed in cold water and dried.
The places without wool have developed delightful puckers and gathers, with great texture. A lovely autumnal scarf.
Cotton scrim, procion mx, wool roving and fibres are all available from The Altered Element.
Thursday 2 September 2010
Altered Element DT tutorial - bag dyeing with Procion MX

I do a lot of dyeing when producing clothing for my store, most commonly using the low water immersion technique on organic bamboo velour, a delightfully strokable fabric. But there are many different ways to apply Procion MX and today I thought I'd show you how to dye in a polythene bag. The measurements given are based on those by Ruth Issett in her book 'Colour on Cloth', though I tend to be flexible in how I stick to these. This recipe makes approx 6 bags of fabric.
Firstly, make up your chemical bases and label and store in airtight containers:
Chemical water:
140g urea
1 tsp Calgon
1 litre warm water
Soda ash solution:
20g soda ash
1 litre very hot water
Select your dyes. If dyeing is new to you, try starting with the 6 basics: lemon, golden yellow, scarlet, magenta, turquoise and ultramarine. For each colour mix a teaspoon with 25mls of warm water, not too hot, stirring well to dissolve all lumps. Add 100mls of chemical water to each pot.
Select your pre-washed fabrics. If you want to experiment on different types of natural fabrics then cut 5-6 squares of fabric per bag, approx 15 by 30 cms each. If you want to dye larger amounts then increase the proportions of mixtures added to suit. I wanted to dye some craft muslin/scrim for a project so chose to cut narrow lengths of this instead.

Add 25mls of dye solution to a bag and squeeze the bag to ensure that the dye reaches all areas of the fabric. Add more dye mix if needed. This can be a different colour if preferred, which can give interesting results if carefully handled, but do be aware that if you use a mix of 3 primary colours it may turn muddy brown if mixed too vigorously. Tie the bag and leave for 10 mins. Repeat for all 6 bags. I made my 3 bags with orange, golden yellow, green and brown dyes, which I used in combination.
After 10 mins add 25 mls of soda solution (more if more dye mixture was added) and squeeze to ensure absorption.

Tie up the bags and leave overnight. Next days, rinse in cold water then wash with a cleaning solution such as Synthrapol or Colsperse. Rinse until clear. I do all this in a washing machine but I'm lazy and often have large amount of fabrics to finish :) For craft purposes. soaking and rinsing by hand may give a deeper colour.

Check back over the coming weeks to see what I did with my dyed scrim ;)
Goodies received from CNA craft swap

Recently on Cloth Nappy Addicts I took part in a craft swap, using stash to make anonymous goodies for a partner. Yersterday I received my swap and I love it!
I received a gorgeous and roomy messenger bag in William Morris' Blackthorn (gren colourway) and purple trims. It is just what I need as I've been meaning to make myself a large bag for ages. And it was accompanied by a matching chipstone bracelet in just the right colours, sitting on a square of the same fabric.
Thank you swapee, they are lovely :)
Wednesday 25 August 2010
Bunting and mail art 2 swaps
Lots of busy swaps on UKStampers at the mo!
Firstly, the bunting swap. For this one we all had to make a single piece of bunting, sized 5 by 8 inches, for each of the group according to their colour theme. I decided to make mine from calico, spraying Ranger colorwash and/or Cosmic Shimmer mists through a Tim Holtz clock mask. Over this I machine stitched a meandering trail. I then hand dyed/painted pieces of cotton cluny lace with various mists and Jacquard Lumiere paints and stitched this on with a wide zigzag. Various images from Artchix and Utkupilli were sewn on and inked captions added. These captions were taken from an index page of a first world war song sheet and were quite random!
Minxy is kindly stitching the bunting into strings. I'm looking forward to seeing my completed bunting :)


We've also been signing up for another mail art swap. My postcard is again on a calico base, dabbed with Jacquard Lumiere, which gives a lovely subtle shimmer. Painted cluny lace is stitched on to appear as waves and an Artchix mermaid is stitched on with another of those song sheet titles - Sandy Hook sounded irresistible as the name of a mermaid! Thinner white cluny lace is stitched on as an accent, representing sea foam. My postcard will be sent naked through the post. I hope the recipient likes it.

UKstampers is currently signing up for a Christmas decoration swap. Do pop in and have a look on the forum, lots to do there.
Child's patchwork quilt - clowns

I've recently started making patchwork quilts. With the exception of my recent William Morris patchwork top, I haven't done any patchwork for about 15 years and those early attempts weren't quilted or bound properly. So I thought I'd start with some simple designs.
This patchwork is a simple log cabin of my own design with pink and blue sides adjacent to beige and green, arranged in a zigzag formation. The top was made from a strip roll (and a half) by Fabric Freedom called Nature's Tones - Pastel and the back is vintage Laura Ashley cotton. The quilting is a simple square design stitched in the ditch. It is approximately 150cm square.


I've now started on a strip quilt of my own design using Moda Bar Harbor scraps and vintage sashing.
Thursday 12 August 2010
The Altered Element DT tutorial - lino carved stamps
I was very excited to receive a new challenge from The Altered Element this month - a lino carving kit! I've never tried making my own stamps before so this was great fun. I thought I'd write a tutorial to show you just how easy it is to make your own stamps.
The lino was Softcut so easy to carve and had a helpful white surface to draw the design on. I decided to draw a stylized greek horse.

This was cut out using sharp craft scissors (the edges were neatened later with a lino cutting blade).

I carved inside the horse using mostly a size 1 blade. The correct angle to carve at is about 25 degrees, this way the blade glides through the surface. Carve away from yourself slowly, carefully avoiding your other hand.

To ink your stamp, pour printing ink onto a tile and load on to a brayer evenly. Apply the ink to your stamp using the brayer. Place your paper onto the stamp and gently brayer over it to impress the design. My layer is slightly thick, printing ink is not my usual medium! I'll know to add less ink next time.
Here is the first print, with another print taking directly afterwards without re-inking. I wanted to show my first attempts to demonstrate that lino carving is not difficult and gives great opportunities for original designs.


I've got plenty of plans for this stamp now and want to play some more, will be trying it out with other inks and paints - can't wait to try Jacquard Lumiere with this. Watch this space.
Lino carving tools will be available soon at The Altered Element.
Subscribe to:
Posts (Atom)